Friday, 20 May 2016

CX-10W drone repair

At the time of writing, I am still waiting for the arrival of the replacement CX-10W from Banggood. So let's see if the burned out drone can be repaired. The charger is pretty much gone, but as the CX-10C uses the same one, I can use that.

Remove the props

Note the position of the propellers. If the quad flips or does not take off after reassembly, you probably have installed them in the wrong order.

Open the craft

That is not as easy as it sounds. The phillips screws are easy enough to remove.But the brackets were harder to unlatch than I thought.
I found it easiest to wedge a fingernail between the PCB and the top shell and unhook the plastic bracket with a spudger.

Locate the fault

I had noticed the green enamelled wires protruding from under the top cover. 
It was most likley to be at least part of the problem.

What looked like a bundle of green wires, really is only one connection connecting the two boards. Obviously that bundle had made contact with the power switch's metal case. This is soldered to the PCB's ground plane.

Quick fix

The cleaner solution would have been to fix the wire's insulation with some kind of varnish. But I didn't have that within arm's reach. What I had instead was a roll of Kapton tape. (Or a cheap knockoff) to insulate the switch's housing against the green wire.

Reassemble

I aligned the wires carefully and fitted the camera back into it's place. It all fits tighlty into the the shell, so some care has to be taken to arrange things properly.
Don't tighten the screws too much. The plastic wears out quickly.

Controlled recharge

To see if it charges normally, I inserted my USB-Meter. Everything looked normal, for what is regarded as "normal" with a charger basically consisting of a 2.2 Ohms resistor.

I always charge from one of my Xiaomi power banks. They switch off when the current drops. This adds a bit of safety to the otherwise unregulated charge process.


Test flight

Well... It does fly. But I don't like the handling/control. A touchscreen might not be the best way to control a drone, or it needs a lot of practice. I have flown quite a few drones but find this one particularly hard to handle.

The recordings are not too great either, but I'll do a bit more research on that.


Tuesday, 26 April 2016

Eachine E10C vs Cheerson CX-10C

Do I really need another minidrone?

German customs will usually let items under 22€ pass without giving you the runaround. So the Eachine E10C caught my eye on Banggood.
Why should I bother? I have a Cheerson CX-10C that I quite like and have given positive reviews on both my blog and on my youtube channel. At the time of writing, the Eachine is about 3€ more expensive than the Cheerson.
Out of curiosity I ordered an E10C and it arrived today.

Looks familiar

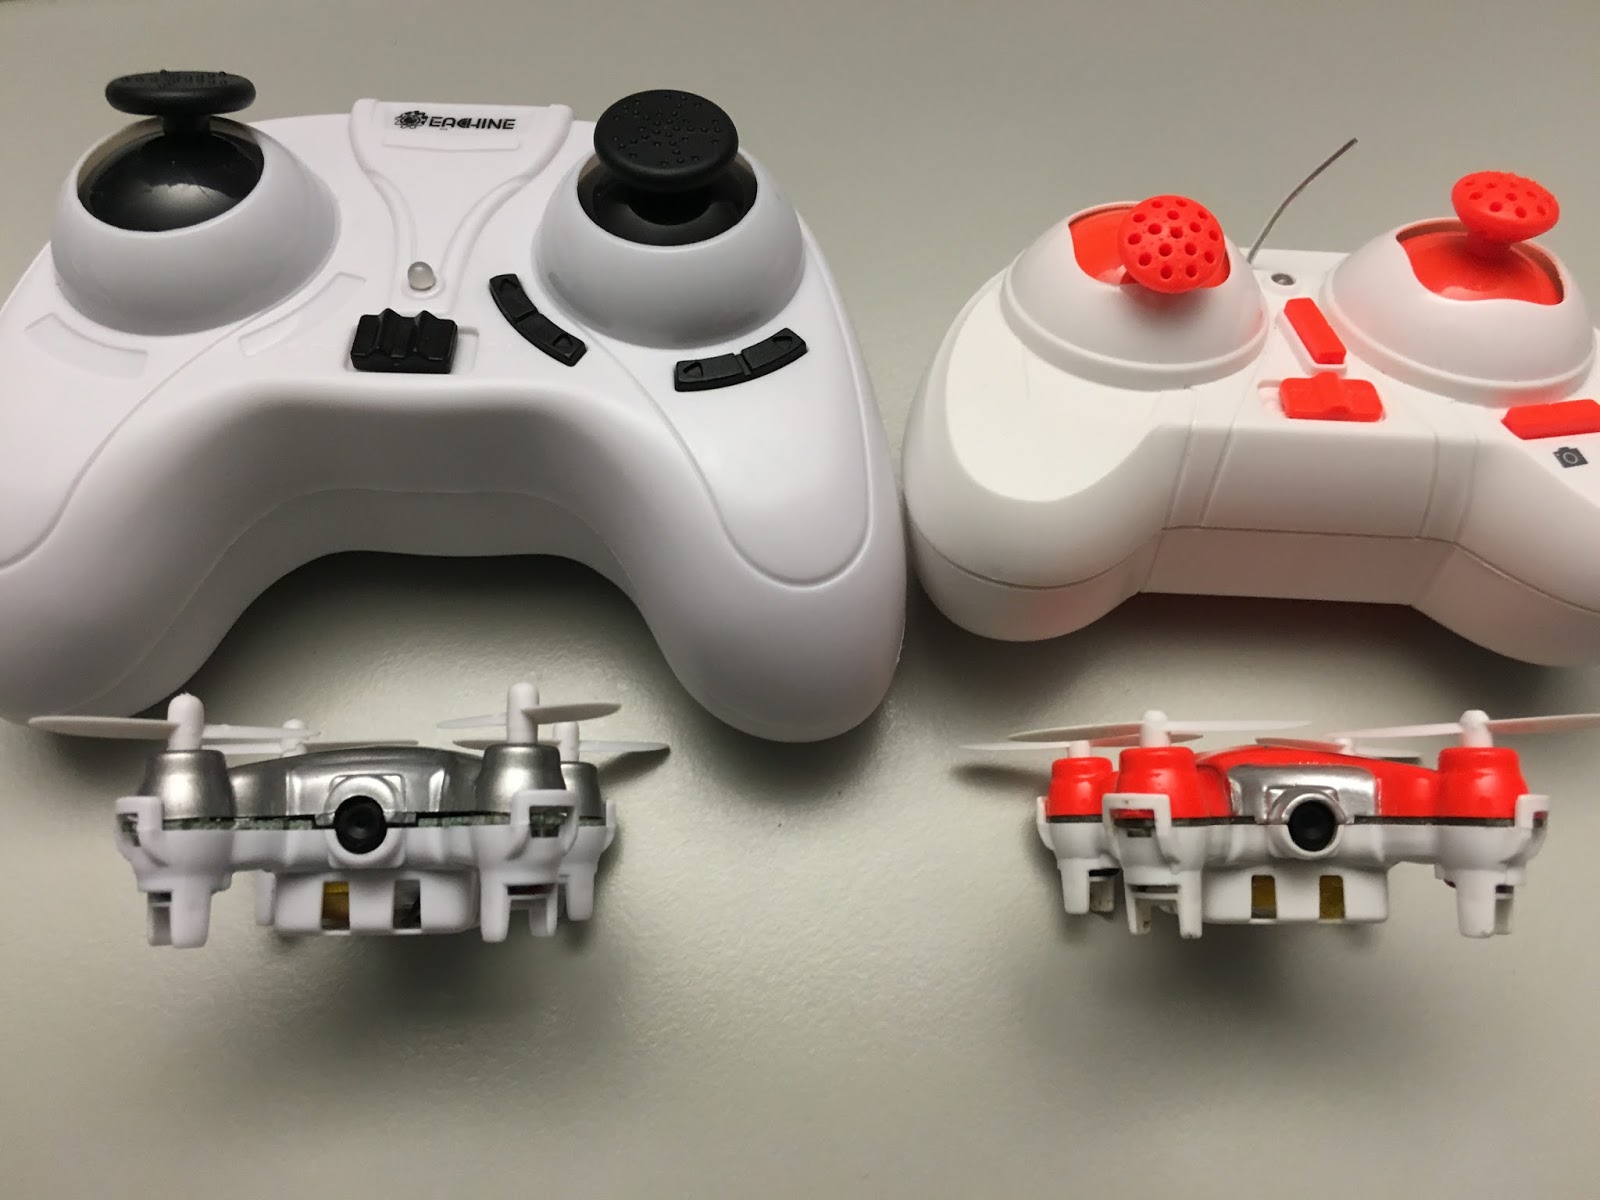
The both crafts look pretty much identical. There are a few differences, but you have to look closely to spot them:
E10C and CX-10C side-by-side

The camera

The most noticable difference when it comes to features, is the 720p camera of the Eachine E10C. But is it worth it? Here are two shots to compare the still image quality:
Cheerson CX-10C (VGA)

Eachine E10C (720p)
The scene was not very well lit and the amazingly good low light performance of the CX-10C clearly shows here. The field of view of the CX-10C is also a bit more pleasant because it "looks down" a bit, which is something I want when recording aerial views of a landscape.
Top: CX-10C Bottom: E10C
But the 720p are not just better on paper. There are significantly less jpg compression artefacts. The still has 1920x1080 (approx. 450kBytes) which corresponds to the 2 megapixels claimed on the box, while the CX-10C writes a modest 640x480 jpg (vga) to a 20kBytes file.
The videos are 1280x720 (Eachine)  and 640x480 (Cheerson) with 30fps each.
The quality is similar to the stills:
Video - Top: CX-10C Bottom: E10C

The transmitters

I haven't taken the Eachine transmitter apart yet. It is a lot bigger, which makes it harder to fit into my pocket. On the other hand I like the shoulder buttons for the still/video camera operation. Cheerson had sacrificed the left/right trimming for that.
The other thing is that the E10C takes two AA batteries while the CX-10C runs on AAA batteries. This transmitter will most likely run forever on one set of batteries.
EDIT 20160504:
I did a range test yesterday. This is how the eachine compares to the cheersons:

Setup Range (m) Range (ft)
Original 10C controller (orange)26m 85ft
Modified 10C controller (orange) 35m 115ft
Original 10A controller (black) 25m 82ft
Modified 10A controller (black) 36m 118ft
Eachine E10C controller 40m 130ft

Pretty impressive, huh? And I haven't even started looking for mods.

The manual

"The battery must be removed from the product prior to charging."
WTF?! Did I even get the right manual for the product? Pretty much everything in there has to be taken with a grain of salt.

Final word

Yes, I am happy I got the E10C. Although I haven't tested in daylight, the camera seems quite a bit better than on the CX-10C and I hope to have a review with video footage on my youtube channel soon. But I'll certainly keep the CX-10C for it's field of view and low light performance.


Wednesday, 20 April 2016

Defective Cheerson CX-10W releases magic smoke

A long wait

It was a very long wait for my Cheerson / Sanlianhuang CX-10W I ordered from Banggood.
The drone was erroneously sent to Georgia (Country Code GE) rather than Germany (Country Code DE). This had never happened before with any of my deliveries and after just two short chat sessions with a support person, they re-sent it.

A very short first impression

I charged it up and did a first flight. Coupling the iPhone and the CX-10W was not a problem at all. It presents itself as an unencrypted access point.
My idea was to sniff the WiFi communication with a Fluke OneTouch AT3000 I have at work and see if I can make any sense of the protocol. But it never came to that.
After an 8 second flight (of which I have a nice recording on my phone), the craft cut out completely and dropped out of the sky. - The sky being about 1.5m up.
It wouldn't turn on afterwards, so took it back home to my workbench.

Magic smoke

Although unlikely to be the cause, the first step was to recharge the battery. I plugged in the charge cable, but the charge indicator wouldn't come up. What did (literally) come up was the white/blue-ish smoke so well known to every seasoned electrical engineer. It came from the charger.
As I knew from earlier investigations, the charge cables of most minidrones are essentially 2.2 Ohms resistors and an indicator led that comes up when the voltage drop over the resistor is low.
It must have been very hot in there
 The transistor has desoldered itself from the PCB and the 2.2 Ohms resistor looks like it has radiated quite a bit of heat, as well.

So why is that so? Looks like way too much current has made it's way through that charge cable. The reason for that should be easy enough to find.

The short

You need to have the tongue at the right angle to probe the pins of the CX-10's charge connector.
That can't be right
0.3 Ohms? Ok, here's the reason for the burned-up charger. Such a blatant fault should be easy to locate. But these drones are tiny. So to have a proper look, I took this close-up photo:
Look closely!
See? There is something green wedged under the shell. We need to look still closer.
That might be the fault
This looks like a bundle of green enameled wires stuck between the top shell and the PCB. What adds to the problem is that the switch probably scraped and/or pushed the wire to the side, scraping off the enamel.
For the moment, that was enough for me to stop investigating and to inform Bangood's support to have it replaced.

Edit - Two good news:
a) Banggood has sent a replacement after a short exchange of mails
b) The short was easy to locate and fixed, rearranging the wires and insulating them with a short length of Kapton tape


Friday, 15 April 2016

How to send emails via gmail from an ESP8266 running NodeMCU

How to send smtp emails via gmail from an ESP8266 running NodeMCU

SSL Support

When I found out about NodeMCU's SSL support (yes: I am very late to the party), one of the first things to try was sending mails. There are web services that will do that for you, but I don't like to have yet another party involved. So I needed SMTP through an SSL connection,
There is an implementation in C here in the forums, but I couldn not find anything ready-made for NodeMCU.
What I did find, was a very nicely written LUA script from "Miguel" in the NodeMCU LUA examples. This only needed a few minor modifications to run on the current DEV-version of NodeMCU:

NodeMCU custom build by frightanic.com
branch: dev
commit: 3f418f995cfccbaf7a745e65c81251c4c50759e6
SSL: true
modules: adc,crypto,file,gpio,http,i2c,net,node,tmr,u8g,uart,wifi
 build built on: 2016-04-11 20:31
 powered by Lua 5.1.4 on SDK 1.5.1(e67da894)

Not all of the modules are really used in this script, of course. So you can trim that down a bit.

Example mail on iPhone


Send an e-mail

With all of that in place, it only took a few minutes to have the first mail sent from my ESP8266-DEV board.
So here is the code for you to try:


 -- Modifications for GMAIL by Andreas "Andy" Reischle: www.AReResearch.net  
 -- See https://support.google.com/a/answer/176600?hl=de for details on smtp with gmail  
 -- Now that NodeMCU has working SSL support, we can also talk to email services that  
 -- require encryption.   
 -- Caveat: I have not looked into the SSL implementation, but I suspect it is vulnerable  
 -- to man-in-the-middle attacks as the client doesn't check the server's certificate.  
 -- 20160415 ARe  
 --------Original Credits:  
 --------  
 ------- Working Example: https://www.youtube.com/watch?v=CcRbFIJ8aeU  
 ------- @description a basic SMTP email example. You must use an account which can provide unencrypted authenticated access.  
 ------- This example was tested with an AOL and Time Warner email accounts. GMail does not offer unecrypted authenticated access.  
 ------- To obtain your email's SMTP server and port simply Google it e.g. [my email domain] SMTP settings  
 ------- For example for timewarner you'll get to this page http://www.timewarnercable.com/en/support/faqs/faqs-internet/e-mailacco/incoming-outgoing-server-addresses.html  
 ------- To Learn more about SMTP email visit:  
 ------- SMTP Commands Reference - http://www.samlogic.net/articles/smtp-commands-reference.htm  
 ------- See "SMTP transport example" in this page http://en.wikipedia.org/wiki/Simple_Mail_Transfer_Protocol  
 ------- @author Miguel  
 --no longer required because it is part of the crypto module: require("base64")  
 -- The email and password from the account you want to send emails from  
 local MY_EMAIL = "YOURMAILADDRESS@gmail.com"  
 local EMAIL_PASSWORD = "YOURPASSWORD"  
 -- The SMTP server and port of your email provider.  
 -- If you don't know it google [my email provider] SMTP settings  
 local SMTP_SERVER = "smtp.gmail.com"  
 local SMTP_PORT = "465"  
 -- The account you want to send email to  
 local mail_to = "RECIPIENT@HISDOMAIN.COM"  
 -- Your access point's SSID and password  
 local SSID = "YOURWIFISSID"  
 local SSID_PASSWORD = "SECRET-I-WONT-TELL"  
 -- configure ESP as a station  
 wifi.setmode(wifi.STATION)  
 wifi.sta.config(SSID,SSID_PASSWORD)  
 wifi.sta.autoconnect(1)  
 -- These are global variables. Don't change their values  
 -- they will be changed in the functions below  
 local email_subject = ""  
 local email_body = ""  
 local count = 0  
 local smtp_socket = nil -- will be used as socket to email server  
 -- The display() function will be used to print the SMTP server's response  
 function display(sck,response)  
    print("Got a response: ")  
    print(response)  
 end  
 -- The do_next() function is used to send the SMTP commands to the SMTP server in the required sequence.  
 -- I was going to use socket callbacks but the code would not run callbacks after the first 3.  
 function do_next()  
       if(count == 0)then  
         count = count+1  
         local IP_ADDRESS = wifi.sta.getip()  
         print ("Send my IP: " .. IP_ADDRESS)  
         smtp_socket:send("HELO "..IP_ADDRESS.."\r\n")  
       elseif(count==1) then  
         count = count+1  
         smtp_socket:send("AUTH LOGIN\r\n")  
       elseif(count == 2) then  
         count = count + 1  
         smtp_socket:send(crypto.toBase64(MY_EMAIL).."\r\n")  
       elseif(count == 3) then  
         count = count + 1  
         smtp_socket:send(crypto.toBase64(EMAIL_PASSWORD).."\r\n")  
       elseif(count==4) then  
         count = count+1  
         smtp_socket:send("MAIL FROM:<" .. MY_EMAIL .. ">\r\n")  
       elseif(count==5) then  
         count = count+1  
         smtp_socket:send("RCPT TO:<" .. mail_to ..">\r\n")  
       elseif(count==6) then  
         count = count+1  
         smtp_socket:send("DATA\r\n")  
       elseif(count==7) then  
         count = count+1  
         local message = string.gsub(  
         "From: \"".. MY_EMAIL .."\"<"..MY_EMAIL..">\r\n" ..  
         "To: \"".. mail_to .. "\"<".. mail_to..">\r\n"..  
         "Subject: ".. email_subject .. "\r\n\r\n" ..  
         email_body,"\r\n.\r\n","")  
         smtp_socket:send(message.."\r\n.\r\n")  
       elseif(count==8) then  
         count = count+1  
          tmr.stop(0)  
          smtp_socket:send("QUIT\r\n")  
       else  
         smtp_socket:close()  
       end  
 end  
 -- The connectted() function is executed when the SMTP socket is connected to the SMTP server.  
 -- This function will create a timer to call the do_next function which will send the SMTP commands  
 -- in sequence, one by one, every 5000 seconds.   
 -- You can change the time to be smaller if that works for you, I used 5000ms just because.  
 function connected(sck)  
   print("Connected - Starting Timer")  
   tmr.alarm(0,5000,1,do_next)  
 end  
 -- @name send_email  
 -- @description Will initiated a socket connection to the SMTP server and trigger the connected() function  
 -- @param subject The email's subject  
 -- @param body The email's body  
 function send_email(subject,body)  
    count = 0  
    email_subject = subject  
    email_body = body  
    print ("Open Connection")  
    smtp_socket = net.createConnection(net.TCP,1)  
    smtp_socket:on("connection",connected)  
    smtp_socket:on("receive",display)  
    smtp_socket:connect(SMTP_PORT,SMTP_SERVER)  
 end  
 -- Send an email  
 print ("Sending started...")  
 send_email("ESP8266-GMailSender","Hi there!")  

This will need a little tidying, but will certainly make it into one of my projects.

Caveat:

NodeMCU's SSL implementation does currently not check the server's certificate. So I suspect man-in-the-middle attacks are easy.

Wednesday, 6 April 2016

Seagate ST500LM000 performance issues in DELL Latitude E6330

My Dell Latitude E6330 at work suffered from a few problems from day one.

  • The touchpad only reacted at the edges of the pad. (I'll get a replacement in a few days - after about an hour on the phone with Dell Support)
  • The Seagate ST500LM hybrid disk was painfully slow. So slow in fact that I ditched the machine and got a Surface Pro3 instead.

The touchpad didn't bother me much, because the laptop spent most of it's day in the docking station and I preferred the touchstick-thing anyway.
The harddisk is another story:
The "Disk Utilization" was under the roof practically 100% of the time. I suspected a contoller issue and updated all the drivers. The only thing I did not do was updating the disk's firmware.

The installed version was DEM4, while Dell currently offers DEM6 for download here.

The procedure was pretty easy:
The "Kahuna_ZPE" executable creates a USB-linux boot environment that will then do all the work when the machine boots from that device.


It seems like the harddisk is not quite as busy any more as it was before the upgrade. But it is still no match for a "real" SSD. Unfortunately I haven't done any before/after measurements.

Results:

  • Tests with the new firmware showed around 80MByte/s transfer rate.
  • All-in-all the machine feels more responsive now

Saturday, 26 March 2016

UDP-Ranger - a simple ESP8266 range tester

The problem

I tried to find reliable information on the range of the ESP-12 series modules, but was not quite happy with what I found. Neither the use of highly directional antennas (or is it "antennae"?) nor the selection of client devices seemed right to draw conclusions about the actual range.

EDIT: see the 1st part of my video about the tester here.
EDIT: and here is the 2nd part if the video with the results

The idea

ESP-8266 modules at both ends of the connection seemed like a good idea to me. Normally you would use a simple ping-test to see if packets are lost on the way between the modules.

ICMP

Despite the fact that the LWIP stack in NodeMCU does handle ICMP properly, I have yet to see a "Ping" program to send/revceive ICMP echo-requests/replies.

TCP

TCP connections between two NodeMCU endpoints are super easy. But the TCP  protocol will do it's best to compensate the loss of packets, so we wouldn't detect missing packets until the connection breaks up completely.

UDP

UDP does not provide such a recovery mechanism for lost packets, so the application has to handle that. We can use that easily to find out when packets go missing.

The solution

Ok, so UDP it is. We'll simply connect an ESP-12e module in station-mode to an ESP-12f module in soft-ap mode and send UDP packets from the ESP-12e to the ESP-12f module.
The payload of each packet is a numer that is incremented by one for each packet. So if a packet is missing, it is easy to detect.
The ESP-modules

What you need


The server.lua script

 local LED_PIN1 = 4  
 gpio.mode(LED_PIN1, gpio.OUTPUT)  
 local sw1 = true  
 wifi.setmode(wifi.SOFTAP)  
 cfg={}  
    cfg.ssid="AReResearch"  
    wifi.ap.config(cfg)  
 function init_OLED(sda,scl)  
    sla = 0x3c  
    i2c.setup(0, sda, scl, i2c.SLOW)  
    disp = u8g.ssd1306_128x64_i2c(sla)  
    disp:setFont(u8g.font_6x10)  
    disp:setFontRefHeightExtendedText()  
    disp:setDefaultForegroundColor()  
    disp:setFontPosTop()  
 end  
 init_OLED(5,6)  
 err=0  
 cold=1  
 disp:firstPage()  
   repeat  
    disp:drawStr(0, 10, "AReResearch UDP-Ranger")  
    disp:drawStr(5, 35, "Waiting for client...")  
   until disp:nextPage() == false  
 s=net.createServer(net.UDP)   
 s:on("receive",function(s,c)  
   print("Sequence="..c.." Previous:"..cold)  
 if ((cold+1)~=tonumber(c)) then  
   err=err+1  
   end  
 disp:firstPage()  
   repeat  
    disp:drawStr(0, 10, "AReResearch UDP-Ranger")  
    disp:drawStr(5, 35, "Packet Nr:" .. c)  
    disp:drawStr(5, 45, "Errors:" .. err)  
     until disp:nextPage() == false  
     if (sw1) then  
       gpio.write(LED_PIN1, gpio.LOW)  
     else  
       gpio.write(LED_PIN1, gpio.HIGH)  
     end  
   sw1 = not sw1  
 cold=c  
 end)   
 s:listen(8888)  

The client-lua script
 wifi.setmode(wifi.STATION)  
 wifi.sta.config("AReResearch","")  
 wifi.sta.connect()  
 LED_PIN1 = 4  
 gpio.mode(LED_PIN1, gpio.OUTPUT)  
 print (wifi.sta.getip())  
 x=1  
 tmr.alarm(2, 1000, 1, function()  
   conn = net.createConnection(net.UDP, 0)  
   conn:connect(8888,"192.168.4.1")  
   conn:send(x)  
   conn:close()  
   conn = nil  
   x=x+1  
   print (x)  
   if x>1000 then x=1 end  
   p=tonumber(wifi.sta.status())  
   print (p)  
   if p == 5  
     then  
     gpio.write(LED_PIN1, gpio.LOW)  
     print ("LED OFF")  
     else  
     gpio.write(LED_PIN1, gpio.HIGH)  
     print ("LED ON")  
     end  
 end)  

Ok, the programming is admittedly a bit sloppy. The counter will simply roll over at 1000 packets and will thus increment the "lost packets" counter by one. It is good enough for me at the moment.

Start the "server"module first

The "client" has sent packets

How to use this

Once the client module has connected to the "server", the server module's  LED will be toggled every time a packet is received. More info in how many packets have been missed is shown on the OLED.
So it is easy to tell when the connection starts breaking up.

The results

My first test run gave me a pretty stable connection up to 300 meters. Beyond 400m I couldn't get anything at all.

Sunday, 13 March 2016

Espressif ESP-12e module radiation pattern

The ESP-12e module has an onboard PCB antenna. When an IoT device is located near the edge of my WIFI network, pointing the antenna the right way may add a few meters to the useable range.
Having had a little time over the weekend, I decided to build a contraption that allows me to rotate the module and record both signal strength and orientation.
There ist a nice protractor.svg file on wikipedia. I use Inkscape to scale and print that.

You may also want to watch my video on this topic here.

Some woodworking

And the protractor
Pointer and tripod adapter
Next I need to put the ESP-12e module in AP-Mode, so it sends beacon packets. Then I wire it in a very basic configuration to run from a 3,7V lithium cell. To drop 0.6V, I put a 1N4148 in series with the module. (Actually, a 1N4148 a bit weak for the job. Go for a 1N4001 if you can. I couldn't find one in my parts bin.)
The TXD/RXD wires are still connected for programming
Can it get any simpler than that? GND and GPIO15 are connected to the negative terminal, VCC and CH_PD to the cathode of the 1N diode. The anode is connected to the positive terminal.
I use a 18650 cell and this holder.
No more unnecessary stuff
Test run
Now mount it all on a tripod and wait for a sunny day to take it all outside where we have little or no reflections.


Ok, let's go outside...


Results

I used LibreOffice to turn the handwritten values into a polar diagram. Here is the resulting  chart:


Although I didn't expect the field to be completely uniform, the result is pretty obvious:
The module (looked at from the component side, antenna pointing away from us) has a clear west-north-westernly preference and a clearly visible minimum at the opposite end. So you'll want that (upper left) corner of the module to point at your access point if you get near the edge of your wifi range.

ToDo

While working on this project, I found out about the ESP-12F, which supposedly has an improved antenna design over the ESP-12E. I do not have one here at the moment, but will compare the two if I can get hold of one.
To get a smoother chart, I should do two full rounds to smooth out the errors and do finer steps (5 instead of 10 degrees).


PS:

If you want to try the same, you don't need a Wifi tester. A PC with InSSIDer (the free 1.3.2.1 version), or even use another ESP-Module as WiFi scanner as shown here.

PPS: Shopping list:

Thin plywood, the size if an A4 paper
The protractor.svg file from wikipedia
A 18650 rechargeable battery. (Well, and a charger if you don't have one)
Suitable 18560 battery holder
One 1N4001 diode
and of course the ESP-12e module