Wednesday 27 July 2016

Fix 0x00000002 error adding a network printer in Windows 10

Since we deployed Win10 on abt. 400 machines, some printing issues we didn't have under win7 turned up. Similar to the 0x00000057 error described here, I now faced a 0x00000002 error when a user tried to add a printer.
I first followed the procedure for the 57 error, but the driver would not automatically install when the user's GPO controlled printer mapping kicked in.

After manually adding the printer with admin-rights, it was also available for the user.

Steps:

  • Delete the old printer driver as described here. As I worked remotely (SCCM) in the user's own session, I used an elevated shell.
  • Reboot
  • Start an elevated shell
  • Run "control printers" to bring up the "add printer" dialog with admin rights

Bring up the add printers dialog with admin rights
  • Go "unlisted printer" and browse your print server's shared printers.
  • Add the required printer.
  • Once the driver has been installed, exit the admin shell.
  • Under the user's account, add the printer again. (This time there should not be an "installing drivers" message)
  • Print a test page
Although it doesn't explicitly state that in the error message, it seems that the 0x00000002 is a rights/privilege issue.

Thursday 21 July 2016

Fix 0x00000057 error adding a network printer in Windows 10

Today one of our support staff approached me with a problem he could not find a solution to:
Our users have their printers assigned via group policies. This works well and the users don't need admin privileges to install the printer drivers.

Apparently a Kyocera printer disappeared from a user's machine and nothing he had tried brought back the printer. By the error message it was a connection problem, but he cound not find any connectivity issues.

I found a hint here, which didn't quite work for me, but set me on the right track.
For our scenario: Win2008R2-64bit print server / Win10 (x64) client, the procedure turned out to be as follows:


  • Run regedit
  • Navigate to: HKEY_LOCAL_MACHINE\SYSTEM\CurrentControlSet\Control\Print\Environments\Windows x64\Drivers\Version-3
  • Find the entry that most likely corresponds to your missing printer
  • Klick that key
  • Find the InfPath entry and note the path. It will be something like: C:\windows\System32\DriverStore\FileRepository\hpcu115u.inf_amd64_4a9d334b04ff58b2\
  • Navigate to that path with explorer
  • Take over ownership of that directory and all subfolders
  • Allow "full access" to the directory for yourself
  • Delete the directory
  • Remove the whole registry key of that printer (like: HKEY_LOCAL_MACHINE\SYSTEM\CurrentControlSet\Control\Print\Environments\Windows x64\Drivers\Version-3\HP Universal Printing PCL 6 (v5.3) )
  • Restart the local spool service
  • Add the print server's shared printer with the "add printer" dialog
That did it for me. The printer drivers were downladed from the print server, installed and now work without any issues.


Wednesday 6 July 2016

GMail notifier with ESP8266 / NodeMCU


A while back I investigated the use of NodeMCU with GMail. One result was this script to send mails over GMail. The other aspect I initially didn't fully investigate was the atom feed offered by GMail.
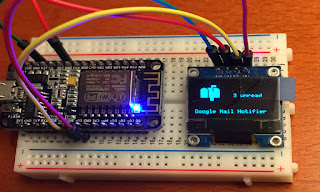
Looks like we have unread mail
If you haven't watched the video yet, here it is.

In the code below, I use that feed to retrieve the number of unread elements from the inbox.
Apart from the Lua code, you also need to place the two files with the mailbox icons on NodeMCU's file system:

Mailoff-file: here
Mailon-file: here

That is what it looks like in action:


I recommend "esplorer" to copy the files to the ESP8266 module.

 -- ESP8266 NodeMCU  
 -- GMail Notifier  
 -- 2016/07 Andy Reischle  
 -- www.AReResearch.net  
 -- Graphics handling and conversion  
 -- adapted from Daniel Eichhorns blog  
 -- http://blog.squix.org/2015/05/esp8266-nodemcu-how-to-create-xbm.html  
 --  
 -- To see this script in action, see:  
 -- https://youtu.be/IVxJosLZCXs  
 wifi.setmode(wifi.STATION)  
 wifi.sta.config("YOUR-SSID","YOUR-WIFIPASS")  
 wifi.sta.connect()  
 -- setup I2c and connect display  
 function init_i2c_display()  
    -- SDA and SCL can be assigned freely to available GPIOs  
    sda = 5 -- GPIO14  
    scl = 6 -- GPIO12  
    sla = 0x3c  
    i2c.setup(0, sda, scl, i2c.SLOW)  
    disp = u8g.ssd1306_128x64_i2c(sla)  
 end  
 function xbm_picture()  
    disp:setFont(u8g.font_6x10)  
    disp:drawStr( 0, 62, "Google Mail Notifier")  
    disp:drawXBM( 10, 5, 32, 32, xbm_data )  
    disp:drawStr (65,30, unread .. " unread")  
 end  
 function bitmap_mailon(delay)  
    file.open("mailon", "r")  
    xbm_data = file.read()  
    file.close()  
    disp:firstPage()  
    repeat  
       xbm_picture()  
    until disp:nextPage() == false  
    tmr.wdclr()  
 end  
 function bitmap_mailoff(delay)  
    file.open("mailoff", "r")  
    xbm_data = file.read()  
    file.close()  
    disp:firstPage()  
    repeat  
       xbm_picture()  
    until disp:nextPage() == false  
    tmr.wdclr()  
 end  
 init_i2c_display()  
 function checkmail()  
 user="YOURADDRESS@GOOGLEMAIL.COM"  
 pass="YOURGMAILPASSWD"  
 b64 = crypto.toBase64(user .. ":" .. pass)  
 -- print (b64)  
 local LED_PIN1 = 4   
 gpio.mode(LED_PIN1, gpio.OUTPUT)  
 conn=net.createConnection(net.TCP, 1)  
 conn:on("receive", function(sck, c)  
 -- print(c)  
 start1,stop1=string.find(c,"<fullcount>")  
 start2,stop2=string.find(c,"</fullcount>")  
 if start1 then  
   unread=string.sub(c,stop1+1,start2-1)  
   print ("Found " .. unread .. " unread Mails.")  
    if tonumber(unread) > 0 then  
         gpio.write(LED_PIN1, gpio.LOW)  
         conn:close() -- we got what we came for, so close  
         bitmap_mailon()  
     else   
         gpio.write(LED_PIN1, gpio.HIGH)   
         conn:close() -- no Mail, so close  
         bitmap_mailoff()  
    end  
  end  
 end )  
 conn:on("connection", function(conn)  
    print("connected")  
    conn:send("GET https://mail.google.com/mail/feed/atom/ HTTP/1.1\r\n" ..  
        "Host: mail.google.com\r\n"..   
        "Authorization: Basic " .. b64 .. "\r\n" ..  
       "User-Agent: Mozilla/4.0 (compatible; esp8266 Lua;)"..  
        "\r\n\r\n")   
 end )  
 conn:on("disconnection", function(conn) print("disconnected") end )  
 conn:connect(443,"mail.google.com")  
 end  
 tmr.alarm(0,30000,tmr.ALARM_AUTO,checkmail)  

Not much stuff is needed for that little project:


Assembly is done in no time at all. Just connect power and I2C leads. (For me, this works without pull-up resistors.)
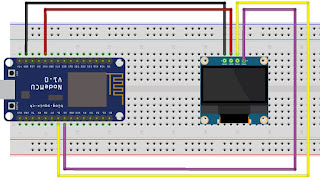
Not a lot to do.