Showing posts with label minidrone. Show all posts

Saturday, 16 May 2020

Tello Motor Repair done right!

How to change a Tello Ryze Drone motor

Other instructions on the web


Before attempting the repair, I checked the web for tutorials. But found most of them pretty terrible, usually causing permanent damage or ugliness to that nice drone.
All except one from DroneZone, which I only found after having finished the repair :-(

That is what a decent job looks like

Tools required

While not really a tool, you need a replacement motor. There are several sources on the web, but they come with small weirdnesses like gears or plugs. Like so often, I got mine from Banggood. They come in two wire lengths (71mm or 87mm), but as a wire can never be too long, I went for the 87mm, although I needed to replace a front motor, where the leads are shorter.
These motors are properly keyed, so you can't confuse the clockwise and counterclockwise motors.

Other than that, good quality precision screwdrivers are a must. Poor screwsrivers ruin the screws. I currently use both a Wowstick, and traditional hand tools, depending on the job at hand.
And of course the wonderful, regulated Mini TS80 soldering iron. The first USB iron that doesn't suck. It does not come cheap, but during the building renovations, when I had no lab space, I learned to love it and won't go back to my old Ersa iron.

Other household items include
  • a pin to peel off the gunk that seals the solder points
  • wire cutters / needle nose pliers
  • Tweezers are handy, too

Problems encountered

If you follow my video (see here), you will find that I struggled at a few points

Cracking the case open

The plastic is very thin, so go around the edges carefully with a spudger.

Removing the gunk over the solder pads

This was a pain. I tried several methods. What worked best in the end was to peel the silicone-like gunk off with a needle. No great fun.

Soldering

Desoldering needed more heat than I thought, given the delicate wires. That might have to do with the solder. I set the iron to 340 degrees centigrade. Later, when soldering the new wires to the board, the joints went dry immediately, so I replaced the solder. (Using solder wick)

Hotglue over the cable duct

Where the motor wire enters the body, there is a drop of hot-snot over the groove the wire runs it. This needs to be cleaned out.

Getting the motor out

That was not really hard. I could pull it out with my pliers, but the cable running through the motor holder gave quite a bit of resistance. So I smelled trouble getting the new wires in.
Motor arm

Putting the new motor in

The actual trouble is to get the new wires through the tiny hole in the motor arm. The trick is to bend the wires at an angle. You can see that in my video.

Final words

After the repair, I went through two freshly charged batteries. No problems. And other than in some repair videos, the drone does not look like it had been chewed up by a dog after the repair.


Tuesday, 11 October 2016

Poor man's FPV: CX10W and Cardboard

Flying FPV on a shoestring budget

I can see myself!

Over the time I have acquired quite a few microdrones. But none of that enabled me to fly FPV. (FPV = First Person View). Although the CX-10W should do the trick, flying with an app, I was never quite happy with it.

Here is the VIDEO on both the build and flight.

There's an app for that

I discovered that there is an alternative to the IOS app recommended by cheerson. It looks like it is from the same makers, but has some extra features. - Like 3D view. Well... not really, if you have one camera. But it gives you two images to view through a "google cardboard" compatible viewer.
WiFi FPV from the AppStore (free)
There are several "FPV" apps on the appstore. The one you're looking for goes by the name "WiFi FPV" and is from "Le Wei Technology". 
2D-View -> change to 3d

3d view

App control sucks

While that is all well and good, I don't like controlling the CX-10W with the app, which doesn't work anyway with the phone a few cms in front of your eyes. But I still have the remote control of my CX-10A, which is compatible with the CX-10W.
The CX-10W can be controlled by all newer CX-10 series remotes

To the workbench!

Apart from that, I need some duck tape, three safety pins and the head band from a broken LED head lamp to make my well used google cardboard clone wearable. I had these for quite a while and they are not available any more. These are probably an OK replacement. And they already come with a strap.
This pic is missing the remote control
I attached the safety pins to the goggles, so I can remove and adjust the strap.
Pins atached. Now the strap.
Tooo easy....

Here's how to set things up

  • Switch on the drone
  • Connect phone to the drone's WiFi AP
  • Start the WiFi FPV app
  • switch to 3d-view
  • (if you want to record your flight, hit the camera button now)
  • insert phone into 3d-goggles
  • turn on remote control
  • pair with drone

And you're good to go!

Outside

There was a very slight wind from NE and the temperature was around 10C, which already affects the battery capacity. Still, I got a few minutes of flight out of the CX-10W.
You will look stupid, too with a cardboard box
in front of your face. Do we care?
I did not find flying easy. Despite the fact that I do hold a sport pilot's license and should not easily be confused by a couple of turns, I lost track of the drone very quickly. I had the feeling that I lost the video stream very often, but it did not look so bad on the recording.
Although the grass was freshly cut, it was hard to locate the tiny drone when it crashed.

Bottom line

A project that didn't cost me anything, didn't take long and was a lot of fun.
Things probably would be easier if he drone held it's hight. The newer model with a barometric pressure sensor for automatic "height hold" is only a little more expensive. I don't have one, but if I had to buy one, I'd go for the CX-10WD in the version with the remote control.


Parts list:

Friday, 20 May 2016

CX-10W drone repair

At the time of writing, I am still waiting for the arrival of the replacement CX-10W from Banggood. So let's see if the burned out drone can be repaired. The charger is pretty much gone, but as the CX-10C uses the same one, I can use that.

Remove the props

Note the position of the propellers. If the quad flips or does not take off after reassembly, you probably have installed them in the wrong order.

Open the craft

That is not as easy as it sounds. The phillips screws are easy enough to remove.But the brackets were harder to unlatch than I thought.
I found it easiest to wedge a fingernail between the PCB and the top shell and unhook the plastic bracket with a spudger.

Locate the fault

I had noticed the green enamelled wires protruding from under the top cover. 
It was most likley to be at least part of the problem.

What looked like a bundle of green wires, really is only one connection connecting the two boards. Obviously that bundle had made contact with the power switch's metal case. This is soldered to the PCB's ground plane.

Quick fix

The cleaner solution would have been to fix the wire's insulation with some kind of varnish. But I didn't have that within arm's reach. What I had instead was a roll of Kapton tape. (Or a cheap knockoff) to insulate the switch's housing against the green wire.

Reassemble

I aligned the wires carefully and fitted the camera back into it's place. It all fits tighlty into the the shell, so some care has to be taken to arrange things properly.
Don't tighten the screws too much. The plastic wears out quickly.

Controlled recharge

To see if it charges normally, I inserted my USB-Meter. Everything looked normal, for what is regarded as "normal" with a charger basically consisting of a 2.2 Ohms resistor.

I always charge from one of my Xiaomi power banks. They switch off when the current drops. This adds a bit of safety to the otherwise unregulated charge process.


Test flight

Well... It does fly. But I don't like the handling/control. A touchscreen might not be the best way to control a drone, or it needs a lot of practice. I have flown quite a few drones but find this one particularly hard to handle.

The recordings are not too great either, but I'll do a bit more research on that.


Tuesday, 26 April 2016

Eachine E10C vs Cheerson CX-10C

Do I really need another minidrone?

German customs will usually let items under 22€ pass without giving you the runaround. So the Eachine E10C caught my eye on Banggood.
Why should I bother? I have a Cheerson CX-10C that I quite like and have given positive reviews on both my blog and on my youtube channel. At the time of writing, the Eachine is about 3€ more expensive than the Cheerson.
Out of curiosity I ordered an E10C and it arrived today.

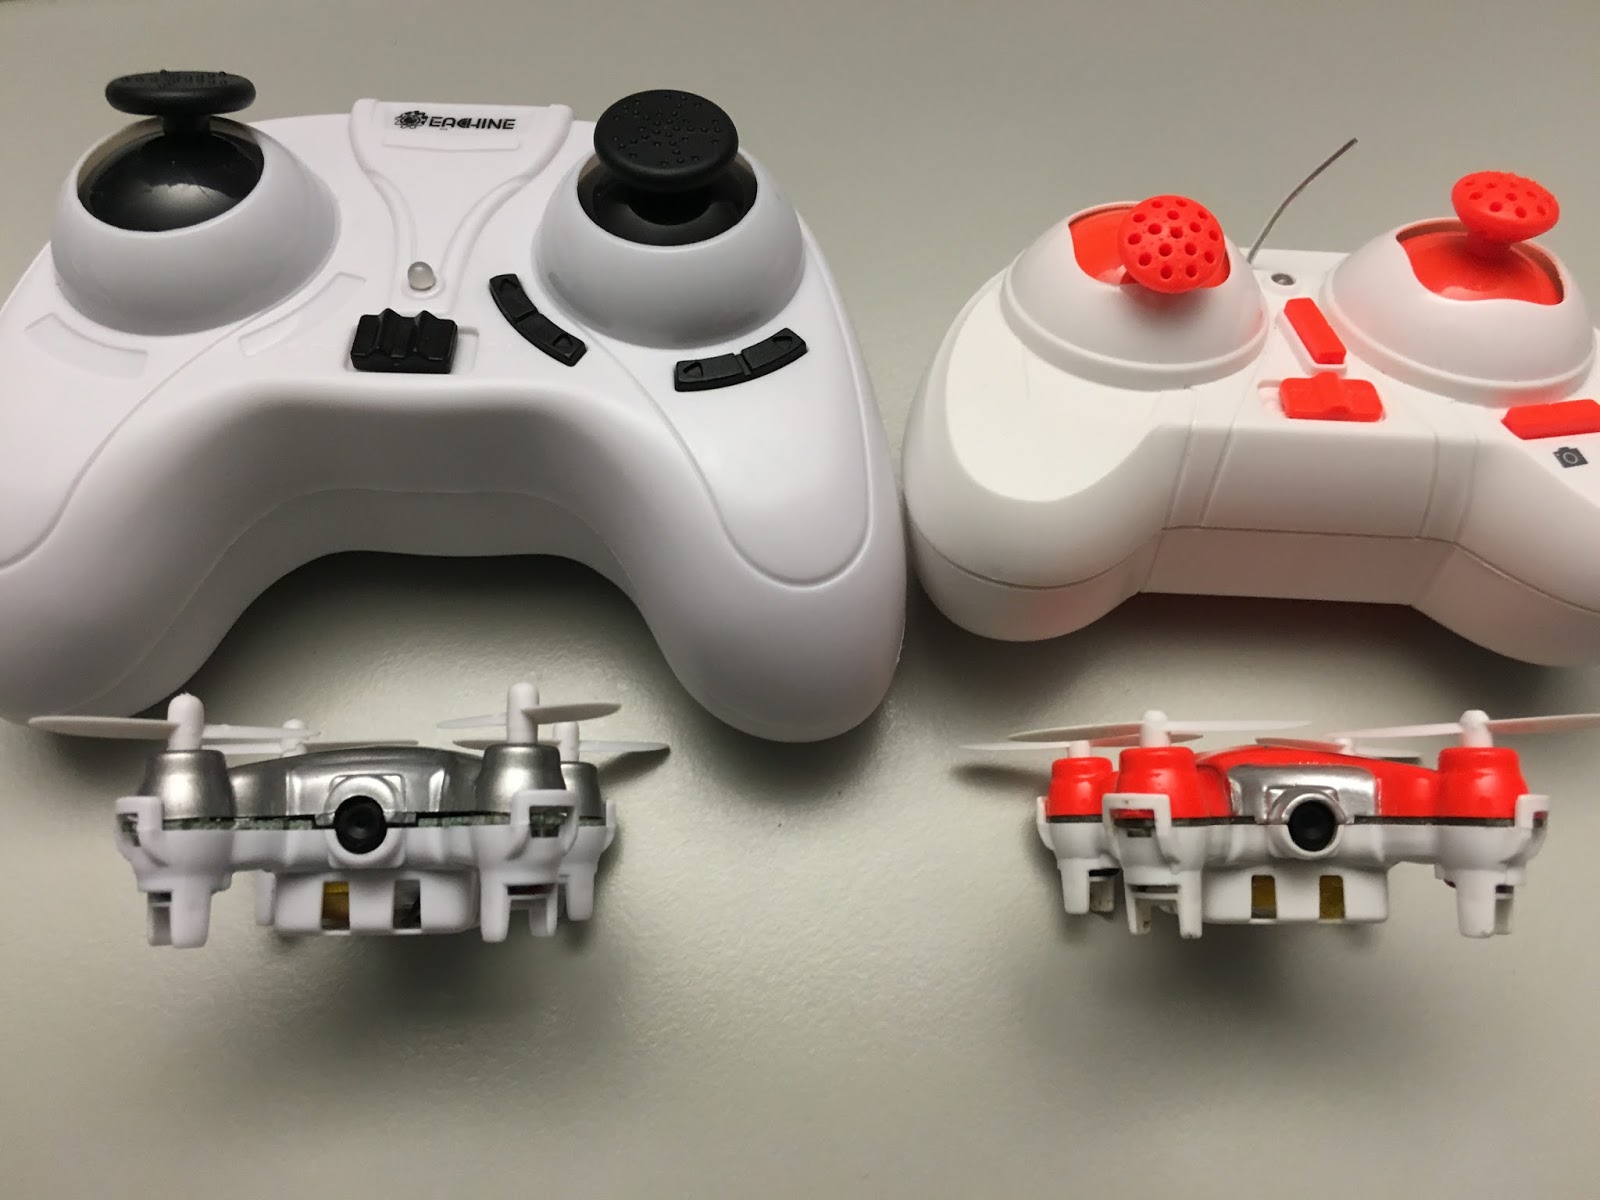
Looks familiar

The both crafts look pretty much identical. There are a few differences, but you have to look closely to spot them:
E10C and CX-10C side-by-side

The camera

The most noticable difference when it comes to features, is the 720p camera of the Eachine E10C. But is it worth it? Here are two shots to compare the still image quality:
Cheerson CX-10C (VGA)

Eachine E10C (720p)
The scene was not very well lit and the amazingly good low light performance of the CX-10C clearly shows here. The field of view of the CX-10C is also a bit more pleasant because it "looks down" a bit, which is something I want when recording aerial views of a landscape.
Top: CX-10C Bottom: E10C
But the 720p are not just better on paper. There are significantly less jpg compression artefacts. The still has 1920x1080 (approx. 450kBytes) which corresponds to the 2 megapixels claimed on the box, while the CX-10C writes a modest 640x480 jpg (vga) to a 20kBytes file.
The videos are 1280x720 (Eachine)  and 640x480 (Cheerson) with 30fps each.
The quality is similar to the stills:
Video - Top: CX-10C Bottom: E10C

The transmitters

I haven't taken the Eachine transmitter apart yet. It is a lot bigger, which makes it harder to fit into my pocket. On the other hand I like the shoulder buttons for the still/video camera operation. Cheerson had sacrificed the left/right trimming for that.
The other thing is that the E10C takes two AA batteries while the CX-10C runs on AAA batteries. This transmitter will most likely run forever on one set of batteries.
EDIT 20160504:
I did a range test yesterday. This is how the eachine compares to the cheersons:

Setup Range (m) Range (ft)
Original 10C controller (orange)26m 85ft
Modified 10C controller (orange) 35m 115ft
Original 10A controller (black) 25m 82ft
Modified 10A controller (black) 36m 118ft
Eachine E10C controller 40m 130ft

Pretty impressive, huh? And I haven't even started looking for mods.

The manual

"The battery must be removed from the product prior to charging."
WTF?! Did I even get the right manual for the product? Pretty much everything in there has to be taken with a grain of salt.

Final word

Yes, I am happy I got the E10C. Although I haven't tested in daylight, the camera seems quite a bit better than on the CX-10C and I hope to have a review with video footage on my youtube channel soon. But I'll certainly keep the CX-10C for it's field of view and low light performance.


Wednesday, 20 April 2016

Defective Cheerson CX-10W releases magic smoke

A long wait

It was a very long wait for my Cheerson / Sanlianhuang CX-10W I ordered from Banggood.
The drone was erroneously sent to Georgia (Country Code GE) rather than Germany (Country Code DE). This had never happened before with any of my deliveries and after just two short chat sessions with a support person, they re-sent it.

A very short first impression

I charged it up and did a first flight. Coupling the iPhone and the CX-10W was not a problem at all. It presents itself as an unencrypted access point.
My idea was to sniff the WiFi communication with a Fluke OneTouch AT3000 I have at work and see if I can make any sense of the protocol. But it never came to that.
After an 8 second flight (of which I have a nice recording on my phone), the craft cut out completely and dropped out of the sky. - The sky being about 1.5m up.
It wouldn't turn on afterwards, so took it back home to my workbench.

Magic smoke

Although unlikely to be the cause, the first step was to recharge the battery. I plugged in the charge cable, but the charge indicator wouldn't come up. What did (literally) come up was the white/blue-ish smoke so well known to every seasoned electrical engineer. It came from the charger.
As I knew from earlier investigations, the charge cables of most minidrones are essentially 2.2 Ohms resistors and an indicator led that comes up when the voltage drop over the resistor is low.
It must have been very hot in there
 The transistor has desoldered itself from the PCB and the 2.2 Ohms resistor looks like it has radiated quite a bit of heat, as well.

So why is that so? Looks like way too much current has made it's way through that charge cable. The reason for that should be easy enough to find.

The short

You need to have the tongue at the right angle to probe the pins of the CX-10's charge connector.
That can't be right
0.3 Ohms? Ok, here's the reason for the burned-up charger. Such a blatant fault should be easy to locate. But these drones are tiny. So to have a proper look, I took this close-up photo:
Look closely!
See? There is something green wedged under the shell. We need to look still closer.
That might be the fault
This looks like a bundle of green enameled wires stuck between the top shell and the PCB. What adds to the problem is that the switch probably scraped and/or pushed the wire to the side, scraping off the enamel.
For the moment, that was enough for me to stop investigating and to inform Bangood's support to have it replaced.

Edit - Two good news:
a) Banggood has sent a replacement after a short exchange of mails
b) The short was easy to locate and fixed, rearranging the wires and insulating them with a short length of Kapton tape


Sunday, 21 February 2016

CX-10 - Extending the flight range

Extending the Cheerson / Sanlianhuan CX-10 C flight range

Disclaimer:
This mod is not my original idea. I've found it here and here. Unfortunately I could not find any information about the additional range gained by the antenna mod. We can fix that.

Also see my video about the same topic here.

The antenna mod

The antenna mod cound hardly be simpler. The transmitter comes apart easily:


  •  remove the screws at the bottom and the handles. Also pry out the on/off switch
  • The transmitter can then be carefully be pulled apart. Take care of the battery cables


  • The antenna wire can easily be located on the transceiver module

  • Drill a small hole through the top cover just above the tranceiver module and stick the antenna wire through it.

  • Put it all back together. Done


What's the range gain?

Now for the part I was most interested in:
I did my range tests in the woods where I was sure not to have any 2,4GHz interference from WiFi or other LPD appliances. The results are pretty clear.

Setup Range (m) Range (ft)
Original 10C controller (orange)26m 85ft
Modified 10C controller (orange) 35m 115ft
Original 10A controller (black) 25m 82ft
Modified 10A controller (black) 36m 118ft
All distances are measured on a horizontal path. The drone's flight level was about 2 meters. The range indicates the distance between the remote control and the spot where the CX-10 crashed because it lost the connection.
Still extracted from video.

The attainable height has also increased to the point that I find it hard to see the craft in the air. But I haven't found a reliable way to measure heights.

Bottom line

Yes, it is totally worth it. The mod is easy and safe for beginners and the nearly extra 10 Meters make quite a difference. I had lost control of the drone a couple of times and had to climb my garage roof to recover it, This hasn't happened since.


PS: Banggood has the CX-10C on sale for under 20€ now.

Tuesday, 19 January 2016

Cheerson CX-10 - Flying below freezing

Finally winter is here!

Complete with snow and everything. So last weekend we tooks the skis and the sled and, of course the CX-10 C drone. (See here for a review in my blog or the video.)
A good opportunity to shoot some spectacular footage of the kids racing down the hills.
Or that's what I thought.
I thought I had the CX-10 C charged up at home and put it in my jacket's outer pocket. So I was amazed that it started flashing a battery warning at me the moment it took off.
After only seconds of flight, it was unable to gain altitude and dropped to the ground.
So I took it back home and the CX-10 C was well again, down in the comfortable 20C of the secret underground lab.
I had expected a somewhat reduced flight time, but nothing that drastic. So to double check I took it out for another test flight later yesterday evening.
Really cold now.
Too little flight time for good shots

EDIT 20160119: Bangggod has the CX-10 C on sale this week for under 20€

The construction of the battery compartment might be good for higher temperatures, but it obviously is a bad idea below freezing. The fans will also add to the cold airflow.
The battery is exposed to the elements.
So my first attempt to improve winter performance is to put some 10mm Kapton tape over the grids to keep the battery warm. All flights have been made with the microSD card inserted, but no recording active.


Setup Batt.tmp Env.tmp Flight-time
No insulation +20C -3C 1:40min
No insulation -3C -3C 0:25min
Kapton tape +20C -3C 2:15min(1)
Kapton tape -4C -4C 0:20min(2)
Indoor flight +20C +20C 2:40min(3)

(1)=Battery warning flashing after 2min. Could not hold altitude after 2:10min. The charge meter showed 60mAh in the subsequent recharge.
(2)=Battery warning flashing after after a few seconds. Could not gain altitude at all. The charge meter showed 12mAh in the subsequent recharge.
(3)=Recharge cap 81mAh after flight

This tape does not add much weight

I conclude from these tests that it makes sense to keep the battery warm (who would have guessed) and to ensure it stays that way as long as possible. I was hoping that a cold, insulated cell would heat up due to the higher internal resistance. But that effect seems to be neglegible here.


Tuesday, 17 November 2015

Flying the Cheerson Sanlianhuan CX-10C camera drone

This blog article is a companion to this youtube video on my channel.

Despite all their limitations, I like the Cheerson minidrones. They are inexpensive, rugged and fit into any jacket's pocket. So they're ideal to take with you on a walk and are great to teach the kids a thing or two about flying. Being a licensed pilot myself (well - for paragliding, that is ), I simply enjoy the occasional flight.

I have both the

  • CX-10 which used to be the world's smallest drone for some time

and  the

  • CX-10A which is a headless version of the above. The headless mode (tap the left stick 2x) takes a lot processing power off the pilot's brain and makes flying easier for the kids. 

We had a little fun with those two in the office and of course one of the first questions was:

"It doesn't have a camera, does it?"
"Naah, no way. That thing can never possibly carry a camera"

Little did I know that only a few months later, the world's smallest camera drone hit the market.
Once the price was down below the magic (German customs regulation) 22€ mark, I ordered one straight from the PRofC. It also has a CE mark on the box, which means it won't get stuck in customs for safety / EMI reasons.

Unboxing

Last week I was delighted to find that CX-10C drone in my mail.
Contents of the package

Setup

It is a little higher that the CX-10 / CX-10A and significantly heavier. I inserted a FAT32 formatted 2GByte micro SD card. - The card's contacts have to face UP when inserting.
PowerBanks are very handy to charge the CX-10C

I charged the battery from my XIAOMI power bank which has the added benefit that it turns off once the charging current drops below (TODO: measure current) mA. The charger does not appear to offer any protection against overcharging. (TODO: double check this) 
To my amazemt, the charge current drops to zero then the LED goes out. So the battery doesn not overcharge.
In all other blogs, the battery capacity is quoted as 120 mAh. On my box it clearly says: 80 mAh
Looks like it only has a 80mAh lipo cell

Flying

I took it to a nearby park for a first test. The first thing I noticed was the sluggish climb rate. The CX-10/A responds far more aggressively to the throttle. Pitch and roll are very low in the default ("junior") mode. That is great to get stable video recordings, but the copter will be blown away even in light winds.
During flips, the drone loses about 1 to 1,5 meters of height. In the older, lighter models this was very well compensated. It is still amazing that it still works, given the increased mass of the thing.

Still pictures

The stills are obviously not great.

Unprocessed still. - Original size

Video recordings

See my youtube video for some of my recordings.
Videos appear over-sharpened to me, which makes the 640x480 resolution appear better than it actually is. If the sun is low on the horizon, colours are a bit washed out.
It is amazingly good in low / artificial light.


Pros:

  • low cost (below 22€ on ebay)
  • CE mark
  • light weight / portable
  • safe - won't hurt too much if you accidentially hit someone
  • ok video quality for the money


Cons:

  • No camera gimbal, so any front/back/side movement will make the viewer seasick.
  • No headless mode. That would make it easier to concentrate on shooting video footage.
  • Poor flight-time vs charge-time ratio
  • No proper charging circuit
  • handles a bit sluggish / poor weight vs power ratio

Final word:
Yes, you want that. It's fun and it's cheap.