Friday, 30 September 2016

Recovering files from a damaged CF card

Loss of memory

This is more like a "note to self", so I remember next time. (Just like the CF-card now does.)

At the media company I work for, we shoot tons of videos and pictures. From time to time something is bound to go wrong.
A colleague who had been at the site of an accident approached me with a 16GByte CF card that mysteriously died on it's way from the camera to the PC's card reader.
Windows only offered to format the card.

Linux to the rescue!

I usually use linux to dd / dd_rescue stuff to a file and work from that. No luck here:
Linux didn't like it at all, reporting multiple errors in syslog. fsck complained about a missing superblock. Nothing worked and I had no time for more investigations.

Windows to the rescue!

So it seems like the file system is badly damaged, possibly with some physical damage to the memory card. Here is how we got the data back:

  • re-inserted the card into the camera
  • did a quick-format (in the camera)
  • removed the card and inserted it into the PC's card reader
  • Windows now accepted the card, but found it empty, of course
  • we downloaded the free version of Recuva 
  • we let Recuva do a deep scan for video files and it found numerous files. The file names were lost, of course
  • we restored all the files on the card to the PC (which included a lot of obsolete files)
  • fortunately the important, new files were all complete and error-free

That was even easier than my usual Linux approach.

The CF-card can't be trusted any more and will be destroyed.

Friday, 23 September 2016

Apple iPad charging slowly or discharging when plugged in

Battery low warning

The media comany I work for presents their IOS apps on local fairs from time to time. I had reports from the ladies presenting the apps on iPads, that they were not charging or even discharging despite being plugged in.

On site

Having nothing better to do on a Friday afternoon, I drove to the fair, equipped with a few spare iPads and power supplies, to see for myself what was going on.
It took me a few minutes to dig my way into the three vandalism-proof iPad stands and get hold of the power supplies. A closer examination of the power suppies made things clear:

Different power ratings

Although Apple has it on their web site, I was not aware of the fact that there are three different power supplies out there. All looking the same.

spot the difference

The power ratings (top-to-bottom) are 12W, 10W and 5W.

Watts: Better to look at them, than to look for them.

The 5W adapter apparently came with an iPad mini, while the 10W adapters are for all iPads without retina display.

With a 10W adapter, an iPad with retina just seems to be able to hold it's charge at reduced screen brightness. A 5W adapter is just useless to keep an iPad retina on constantly.

I replaced all chargers with 12W models. All iPads charged up ok, leaving some happy people to work through the weekend on the fair.

Friday, 9 September 2016

Win10 and TrendMicro OfficeScan - ANOMALY: use of REX.w is meaningless

For a few days now, I get the message:

[0x7FFAD4C870E3] ANOMALY: use of REX.w is meaningless (default operand size is 64)

when calling pretty much any network related command in a cmd-shell. This is the case for both normal and elevated shells.

The symptom went away when disabling TrendMicro OfficeScan on my machine.

It probably came with the latest patch from TrendMicro to provide compatibility with Win10 anniversary edition:

Apart from that, there are no negative effects on my system so far.

UPDATE:

Read on --> HERE <-- for the follow-up

Sunday, 14 August 2016

Mini ESP8266 dev board and a demo WiFi hack

I attended a one week network security training recently and taught end-user security awareness a little later. One outstanding topic in both trainings were weak WPA/WPA2 passwords.
I actually wanted to explore ways to use menues on my little I2C OLED display. So I set out to combine testing for weak WiFi passwords and findind a way to make easy to use menus.

But menues need buttons and there was no space left on my little breadboard between the NodeMCU dev module and the OLED. So I looked for smaller breadboard-ready ESP8266 dev modules and found this inexpensive ESP8266 Dev Mini Module.


Further research showed that this might be pretty much a knockoff of the Wemos D1 Mini, I hadn't seen before.
This board has a lot less pins as compared to a full NodeMCU dev board. But all the important ones seem to be there. The board came with a set of headers and I decided to make the USB stuff the bottom side, so I can see the LED on the ESP-12F module.
Top view: ESP-12f

Bottom view: USB
The USB drivers auto-installed on my Windows 10 machine.


So my first project with this board was a very simple WiFi security scanner that lists all available AccessPoints (excluding the invisible ones) and try to get in with a list of passwords stored in the SPIFFS file system.

Here is my video about both the module and the Wifi Security tester.


Fritzing schematic of the WiFi scanner
My motivation was to find out how to make a simple menue system. The current implementations has quite a few shortcommings. Eg: The list of WiFi targets can only be a few items long, and does not scroll. Simpley because the number of  networks visible from my lab was never longer than that.
I use interrupts (falling edge) on the GPIO pins to trigger functions that increment or decrement the menu selection bar.

Good WPA/WPA2 password lists are shipped with Kali linux, but these are *WAY* too big to fit on the module's file system. You have to ressort to "educated guessing" there,

If you are looking for the code for the Wifi-Security tester, it is up on my GitHub repository. It still needs quite a lot of cleanup and a few functions should be rewritten, so beware!


Wednesday, 27 July 2016

Fix 0x00000002 error adding a network printer in Windows 10

Since we deployed Win10 on abt. 400 machines, some printing issues we didn't have under win7 turned up. Similar to the 0x00000057 error described here, I now faced a 0x00000002 error when a user tried to add a printer.
I first followed the procedure for the 57 error, but the driver would not automatically install when the user's GPO controlled printer mapping kicked in.

After manually adding the printer with admin-rights, it was also available for the user.

Steps:

  • Delete the old printer driver as described here. As I worked remotely (SCCM) in the user's own session, I used an elevated shell.
  • Reboot
  • Start an elevated shell
  • Run "control printers" to bring up the "add printer" dialog with admin rights

Bring up the add printers dialog with admin rights
  • Go "unlisted printer" and browse your print server's shared printers.
  • Add the required printer.
  • Once the driver has been installed, exit the admin shell.
  • Under the user's account, add the printer again. (This time there should not be an "installing drivers" message)
  • Print a test page
Although it doesn't explicitly state that in the error message, it seems that the 0x00000002 is a rights/privilege issue.

Thursday, 21 July 2016

Fix 0x00000057 error adding a network printer in Windows 10

Today one of our support staff approached me with a problem he could not find a solution to:
Our users have their printers assigned via group policies. This works well and the users don't need admin privileges to install the printer drivers.

Apparently a Kyocera printer disappeared from a user's machine and nothing he had tried brought back the printer. By the error message it was a connection problem, but he cound not find any connectivity issues.

I found a hint here, which didn't quite work for me, but set me on the right track.
For our scenario: Win2008R2-64bit print server / Win10 (x64) client, the procedure turned out to be as follows:


  • Run regedit
  • Navigate to: HKEY_LOCAL_MACHINE\SYSTEM\CurrentControlSet\Control\Print\Environments\Windows x64\Drivers\Version-3
  • Find the entry that most likely corresponds to your missing printer
  • Klick that key
  • Find the InfPath entry and note the path. It will be something like: C:\windows\System32\DriverStore\FileRepository\hpcu115u.inf_amd64_4a9d334b04ff58b2\
  • Navigate to that path with explorer
  • Take over ownership of that directory and all subfolders
  • Allow "full access" to the directory for yourself
  • Delete the directory
  • Remove the whole registry key of that printer (like: HKEY_LOCAL_MACHINE\SYSTEM\CurrentControlSet\Control\Print\Environments\Windows x64\Drivers\Version-3\HP Universal Printing PCL 6 (v5.3) )
  • Restart the local spool service
  • Add the print server's shared printer with the "add printer" dialog
That did it for me. The printer drivers were downladed from the print server, installed and now work without any issues.


Wednesday, 6 July 2016

GMail notifier with ESP8266 / NodeMCU


A while back I investigated the use of NodeMCU with GMail. One result was this script to send mails over GMail. The other aspect I initially didn't fully investigate was the atom feed offered by GMail.
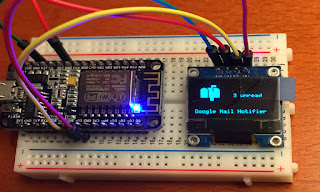
Looks like we have unread mail
If you haven't watched the video yet, here it is.

In the code below, I use that feed to retrieve the number of unread elements from the inbox.
Apart from the Lua code, you also need to place the two files with the mailbox icons on NodeMCU's file system:

Mailoff-file: here
Mailon-file: here

That is what it looks like in action:


I recommend "esplorer" to copy the files to the ESP8266 module.

 -- ESP8266 NodeMCU  
 -- GMail Notifier  
 -- 2016/07 Andy Reischle  
 -- www.AReResearch.net  
 -- Graphics handling and conversion  
 -- adapted from Daniel Eichhorns blog  
 -- http://blog.squix.org/2015/05/esp8266-nodemcu-how-to-create-xbm.html  
 --  
 -- To see this script in action, see:  
 -- https://youtu.be/IVxJosLZCXs  
 wifi.setmode(wifi.STATION)  
 wifi.sta.config("YOUR-SSID","YOUR-WIFIPASS")  
 wifi.sta.connect()  
 -- setup I2c and connect display  
 function init_i2c_display()  
    -- SDA and SCL can be assigned freely to available GPIOs  
    sda = 5 -- GPIO14  
    scl = 6 -- GPIO12  
    sla = 0x3c  
    i2c.setup(0, sda, scl, i2c.SLOW)  
    disp = u8g.ssd1306_128x64_i2c(sla)  
 end  
 function xbm_picture()  
    disp:setFont(u8g.font_6x10)  
    disp:drawStr( 0, 62, "Google Mail Notifier")  
    disp:drawXBM( 10, 5, 32, 32, xbm_data )  
    disp:drawStr (65,30, unread .. " unread")  
 end  
 function bitmap_mailon(delay)  
    file.open("mailon", "r")  
    xbm_data = file.read()  
    file.close()  
    disp:firstPage()  
    repeat  
       xbm_picture()  
    until disp:nextPage() == false  
    tmr.wdclr()  
 end  
 function bitmap_mailoff(delay)  
    file.open("mailoff", "r")  
    xbm_data = file.read()  
    file.close()  
    disp:firstPage()  
    repeat  
       xbm_picture()  
    until disp:nextPage() == false  
    tmr.wdclr()  
 end  
 init_i2c_display()  
 function checkmail()  
 user="YOURADDRESS@GOOGLEMAIL.COM"  
 pass="YOURGMAILPASSWD"  
 b64 = crypto.toBase64(user .. ":" .. pass)  
 -- print (b64)  
 local LED_PIN1 = 4   
 gpio.mode(LED_PIN1, gpio.OUTPUT)  
 conn=net.createConnection(net.TCP, 1)  
 conn:on("receive", function(sck, c)  
 -- print(c)  
 start1,stop1=string.find(c,"<fullcount>")  
 start2,stop2=string.find(c,"</fullcount>")  
 if start1 then  
   unread=string.sub(c,stop1+1,start2-1)  
   print ("Found " .. unread .. " unread Mails.")  
    if tonumber(unread) > 0 then  
         gpio.write(LED_PIN1, gpio.LOW)  
         conn:close() -- we got what we came for, so close  
         bitmap_mailon()  
     else   
         gpio.write(LED_PIN1, gpio.HIGH)   
         conn:close() -- no Mail, so close  
         bitmap_mailoff()  
    end  
  end  
 end )  
 conn:on("connection", function(conn)  
    print("connected")  
    conn:send("GET https://mail.google.com/mail/feed/atom/ HTTP/1.1\r\n" ..  
        "Host: mail.google.com\r\n"..   
        "Authorization: Basic " .. b64 .. "\r\n" ..  
       "User-Agent: Mozilla/4.0 (compatible; esp8266 Lua;)"..  
        "\r\n\r\n")   
 end )  
 conn:on("disconnection", function(conn) print("disconnected") end )  
 conn:connect(443,"mail.google.com")  
 end  
 tmr.alarm(0,30000,tmr.ALARM_AUTO,checkmail)  

Not much stuff is needed for that little project:


Assembly is done in no time at all. Just connect power and I2C leads. (For me, this works without pull-up resistors.)
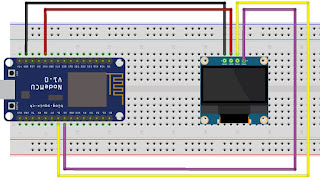
Not a lot to do.